A Landscape Lighting Design Guide For Florida Homeowners


Looking to add some ambience to your yard?

In this guide, we’ll walk you through the steps for designing a landscape lighting plan for your yard:

  1. Decide what kind of lighting display you want
  2. Select a fixture bulb type
  3. Choose a low-voltage transformer
  4. Map out your design
  5. Determine the best wiring layout

Let’s dive in.

Want a lighting specialist to do it all for you?

Contact us

For more info and to see some of the landscape lighting we’ve done, check out our landscape lighting service page.

Step 1: Decide what kind of lighting display you want

Before you choose your fixtures, you first need to decide what you want to achieve with the lighting.

Do you want to:

  • Frame a pathway, garden, or other area? Go with path lights. These lights are little posts that cast a soft orb of light, which makes them good for framing areas of your yard.
  • Brighten up a space or add ambient lighting to your home? Choose a flood or wash light. Both cast a wide beam of light over a large area, but flood lights tend to be a little brighter than wash lights.
  • Highlight a tree, architectural detail, or other yard feature? Spotlights (also known as “bullet” lights) project a narrow beam of light, which is great for highlighting a precise area.
  • Illuminate an area beneath a tree or textured wall? Spotlights and well lights (fixtures recessed in the ground) both cast uplight to add drama to walls and foliage.
  • Add downlighting to an area? Use moon lights (sometimes called “tree” lights). These lights attach to a high-up tree branch to cast light down onto the tree, creating a moonlight effect.


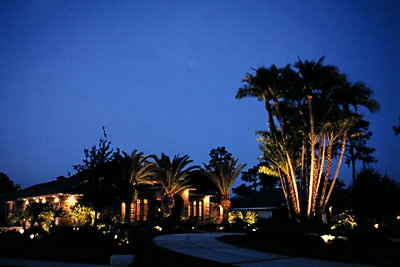
Different light fixtures achieve different kinds of lighting

Now, it’s time to decide what kind of bulbs you want.

Step 2: Select a fixture bulb type

Most Florida homeowners use either halogen (energy-saving incandescent) or LED bulbs for landscape lighting.

Our recommendation: If you can swing the higher upfront cost of LED lights ($20–$40 per light compared to halogen’s $4–$10 per light), LED will cost you less in the long run.

Here’s why:

  • LED bulbs have a longer lifespan. LED bulbs need replaced every 5–10 years, while halogen ones need replace every 8–12 months.
  • LED bulbs use less energy. According to the Department of Energy, LED bulbs use 25–30% less energy and last 25 times longer than halogen lighting.

For more info about the cost of installing LED versus halogen bulbs, check out our article, “How Much Does It Cost to Install Low-Voltage Landscape Lighting?

Step 3: Choose a low-voltage transformer

A transformer is a device that transfers power (either increasing or decreasing the voltage) from one circuit to another.

You might be wondering, “Why do I even need a transformer? Can’t I just plug the fixtures in an outlet?”

First off, you have 2 voltage choices for outdoor lighting: low voltage (12V or 24V) and line voltage (120V).

With line-voltage lighting, you can just plug those fixtures into an outlet. However, low-voltage lighting is more common for landscape lighting because it:

  • Is safer and easier to install
  • Operates safely in wet conditions
  • Costs less to operate in the long run
  • Gives you more variety in fixture options

Because low-voltage lighting needs voltage lower than what your power supply outputs (normally 120V or 277V), you need a transformer to convert the voltage down, so you don’t fry your fixtures.

When choosing your low-voltage transformer, you need to determine:

  • Voltage: First find out (from the product description) whether your light fixtures need 12 or 24 volts. Also figure out whether your power source is 120V or 227V (most sources in the US output 120V), so you know what kind of transformer to buy.
  • Magnetic or electronic: We recommend using magnetic low-voltage transformers. Electronic transformers are smaller and more affordable, but magnetic transformers are more durable (especially in the Florida heat) and last much longer than electric ones.
  • Wattage: To figure out how many watts your transformer needs to power, add together the wattage of all your light fixtures. (Don’t forget to account for extra bulbs if a fixture uses more than one.) Then, choose a transformer with a maximum wattage load that exceeds how much wattage you need.

Step 4: Map out your design

Grab a pencil and sketch out your property. Draw where you want your fixtures and transformer, writing down dimensions so you have an accurate estimate for how much wiring you’ll need.

Once you’re happy with the design, mark where you want your fixtures and transformer with flags in your yard.

Now that you know where you want your fixtures, you can determine the best route for wiring.

Step 5: Determine the best wiring layout

You can run wiring for landscape lighting fixtures several different ways:


The empty boxes represent the light fixtures, boxes labeled “T” represent the transformer, the box labeled “H” represents the junction hub (see below) and the lines represent wiring.

Each layout works best for certain situations:

  • Daisy chain: This method is popular for a few fixtures that will go in a straight line.
    However, the problem with this layout is that the longer your “chain” is, the more voltage you lose (0.2–0.9V) with each connection. For example, let’s say you have a chain of 6 lights with a 0.6V drop at each connection. Your first fixture may get 12V, but your last one might only have 8.4V and appear noticeably dimmer.
  • T-method: This method gives you the same look of the daisy chain, but with less voltage drop. Although, the more fixtures you have, the more voltage drop you’ll get.
  • Hub method: In this method, your transformer connects to a junction hub that then powers your fixtures. Use the hub method for grouped fixtures or combine it with the daisy chain or T-method arrangement to prevent voltage drop.

Want a Florida pro to brighten up your yard?

We have more than 28 years of experience doing landscape lighting. Our outdoor lighting specialists will work with you to create a lighting design that suits your home, taste, and budget. Then, one of our experienced electricians will safely install it.

Related reading:

Contact or Schedule a Repair Online!

Contact our Energy Today team, today!

Ready for service?

Related Reading